
Pixel Lens is a real-time conversion app for Windows: hold its floating “lens window” over anything on your screen, and whatever is underneath turns into pixel art on the spot.
YouTube, anime, games — anything on screen can be converted, exactly where you want it. The conversion runs on a proprietary ultra-lightweight AI model of just about 4 MB, entirely on your local GPU (works offline, no account required).
Promo Video
More videos and examples are available on the YouTube channel.
Example Screenshots
Games

Anime / Cartoons
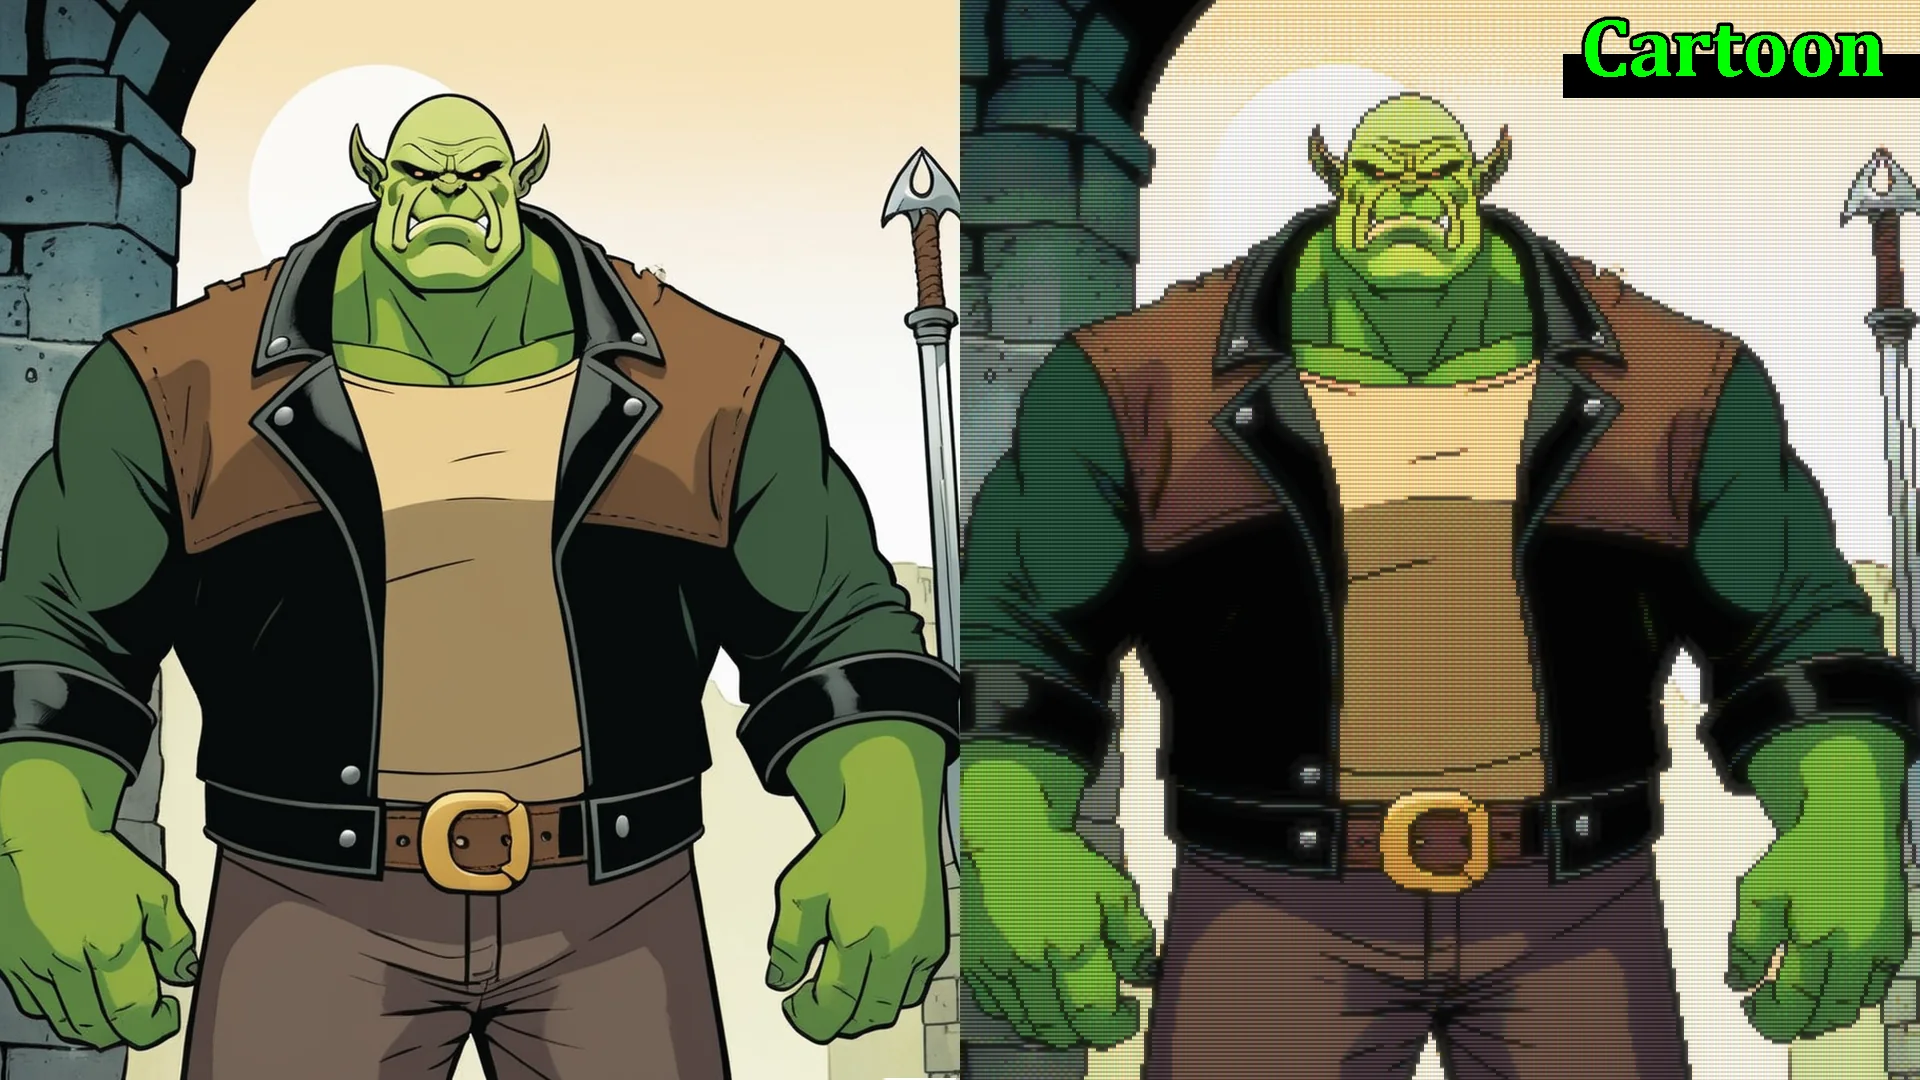
Music Videos
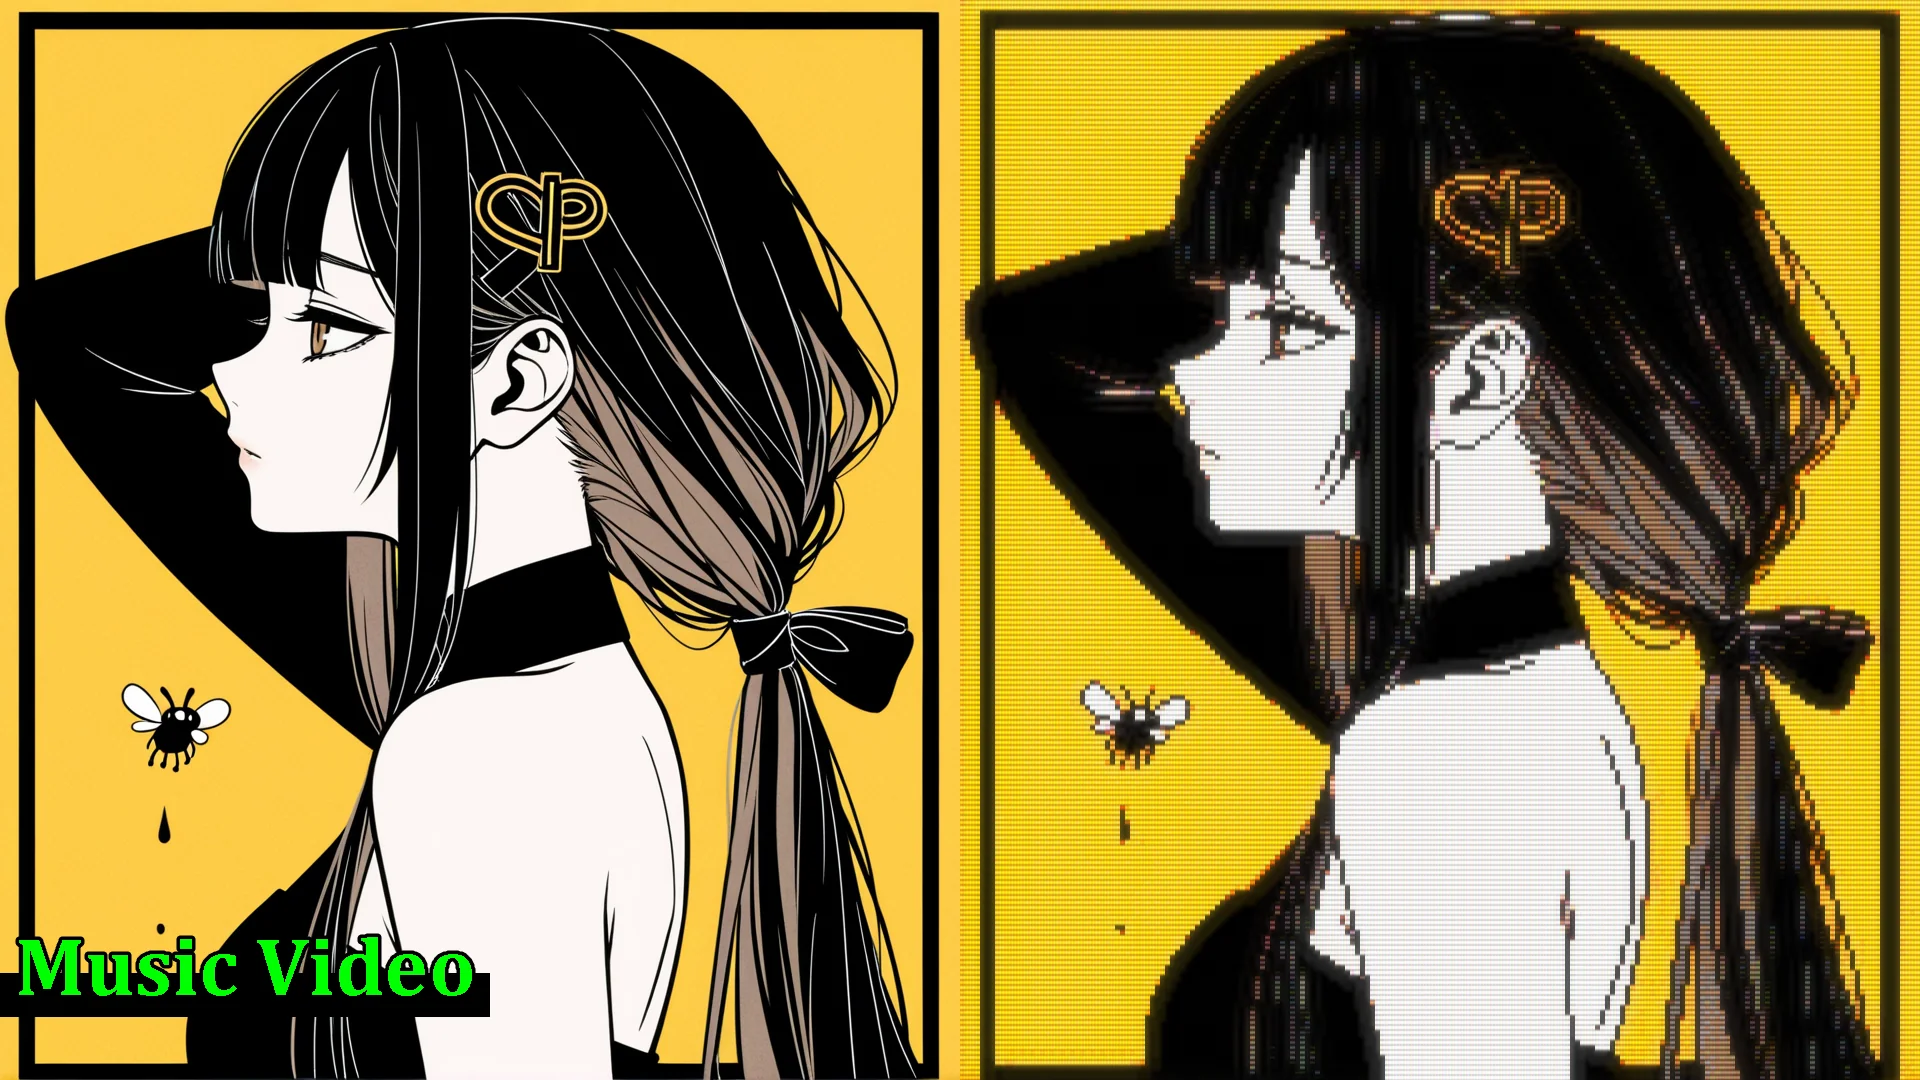
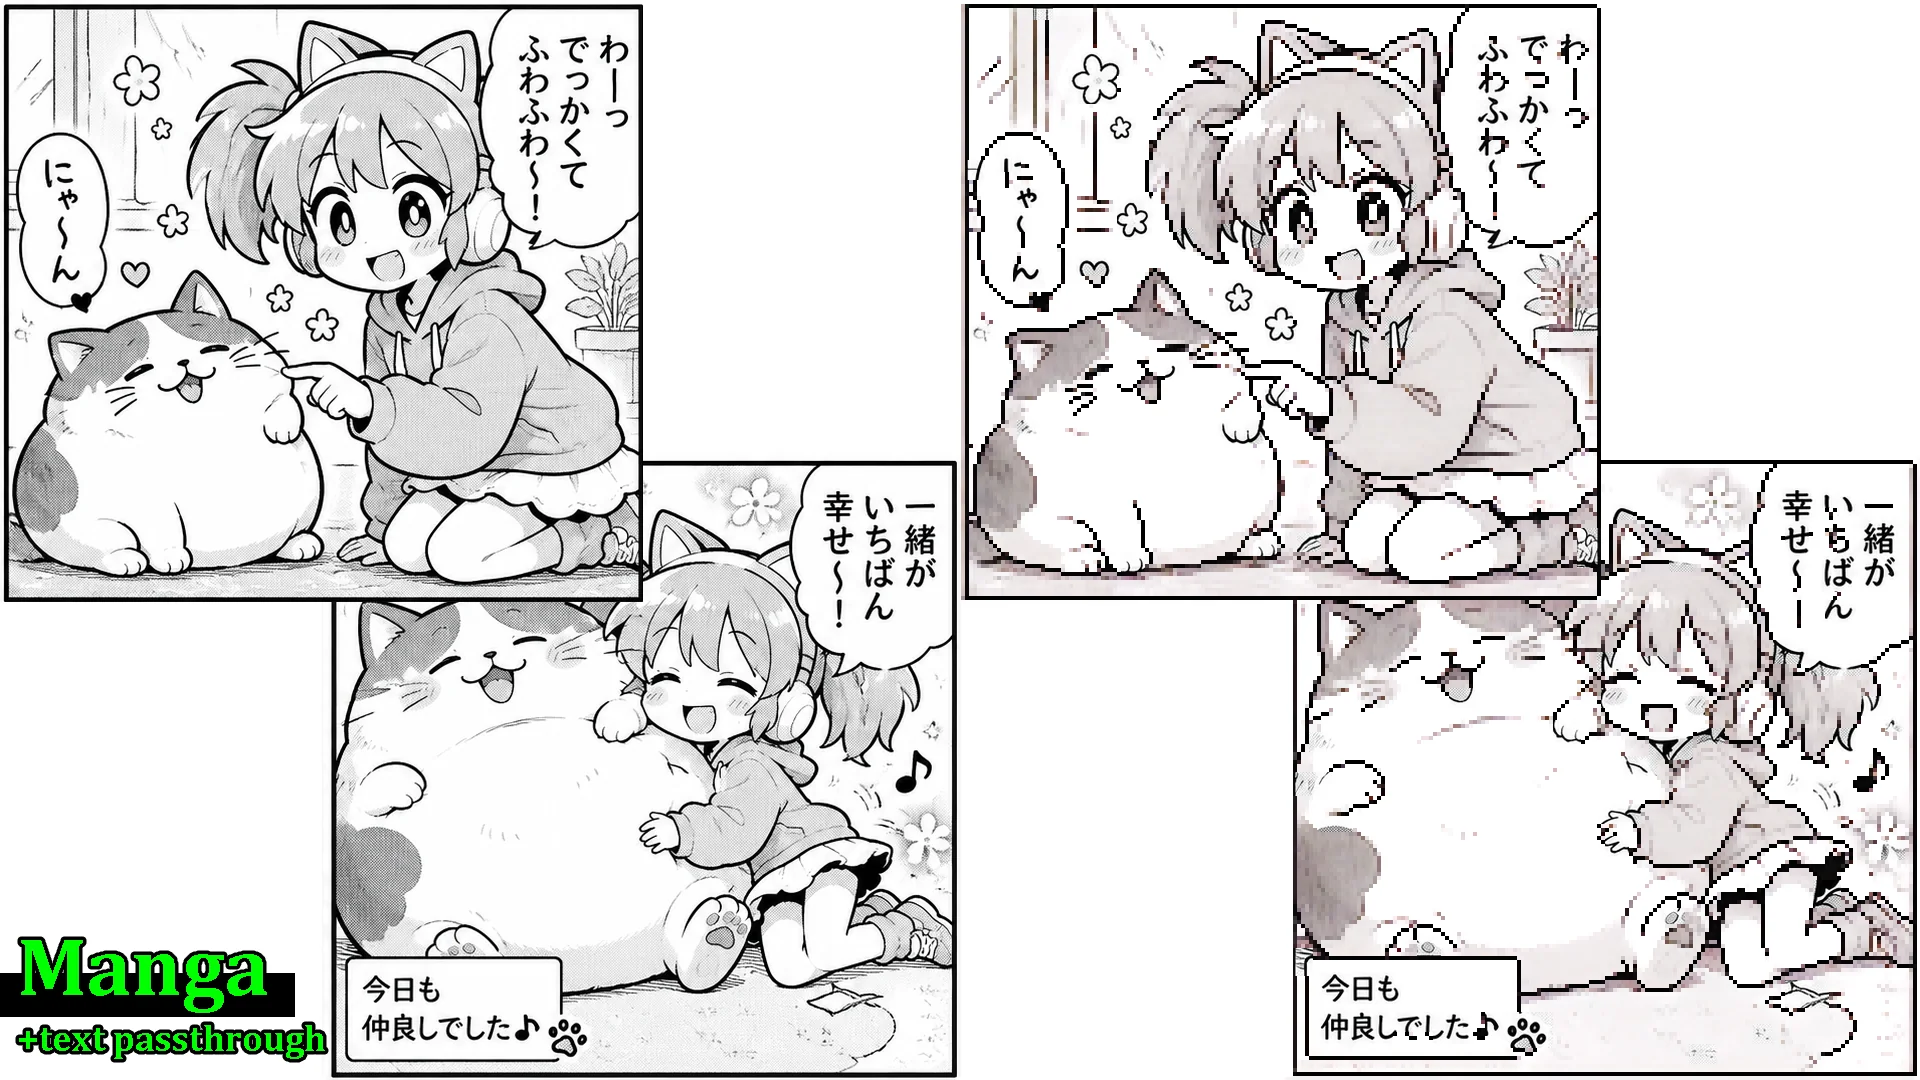
Manga
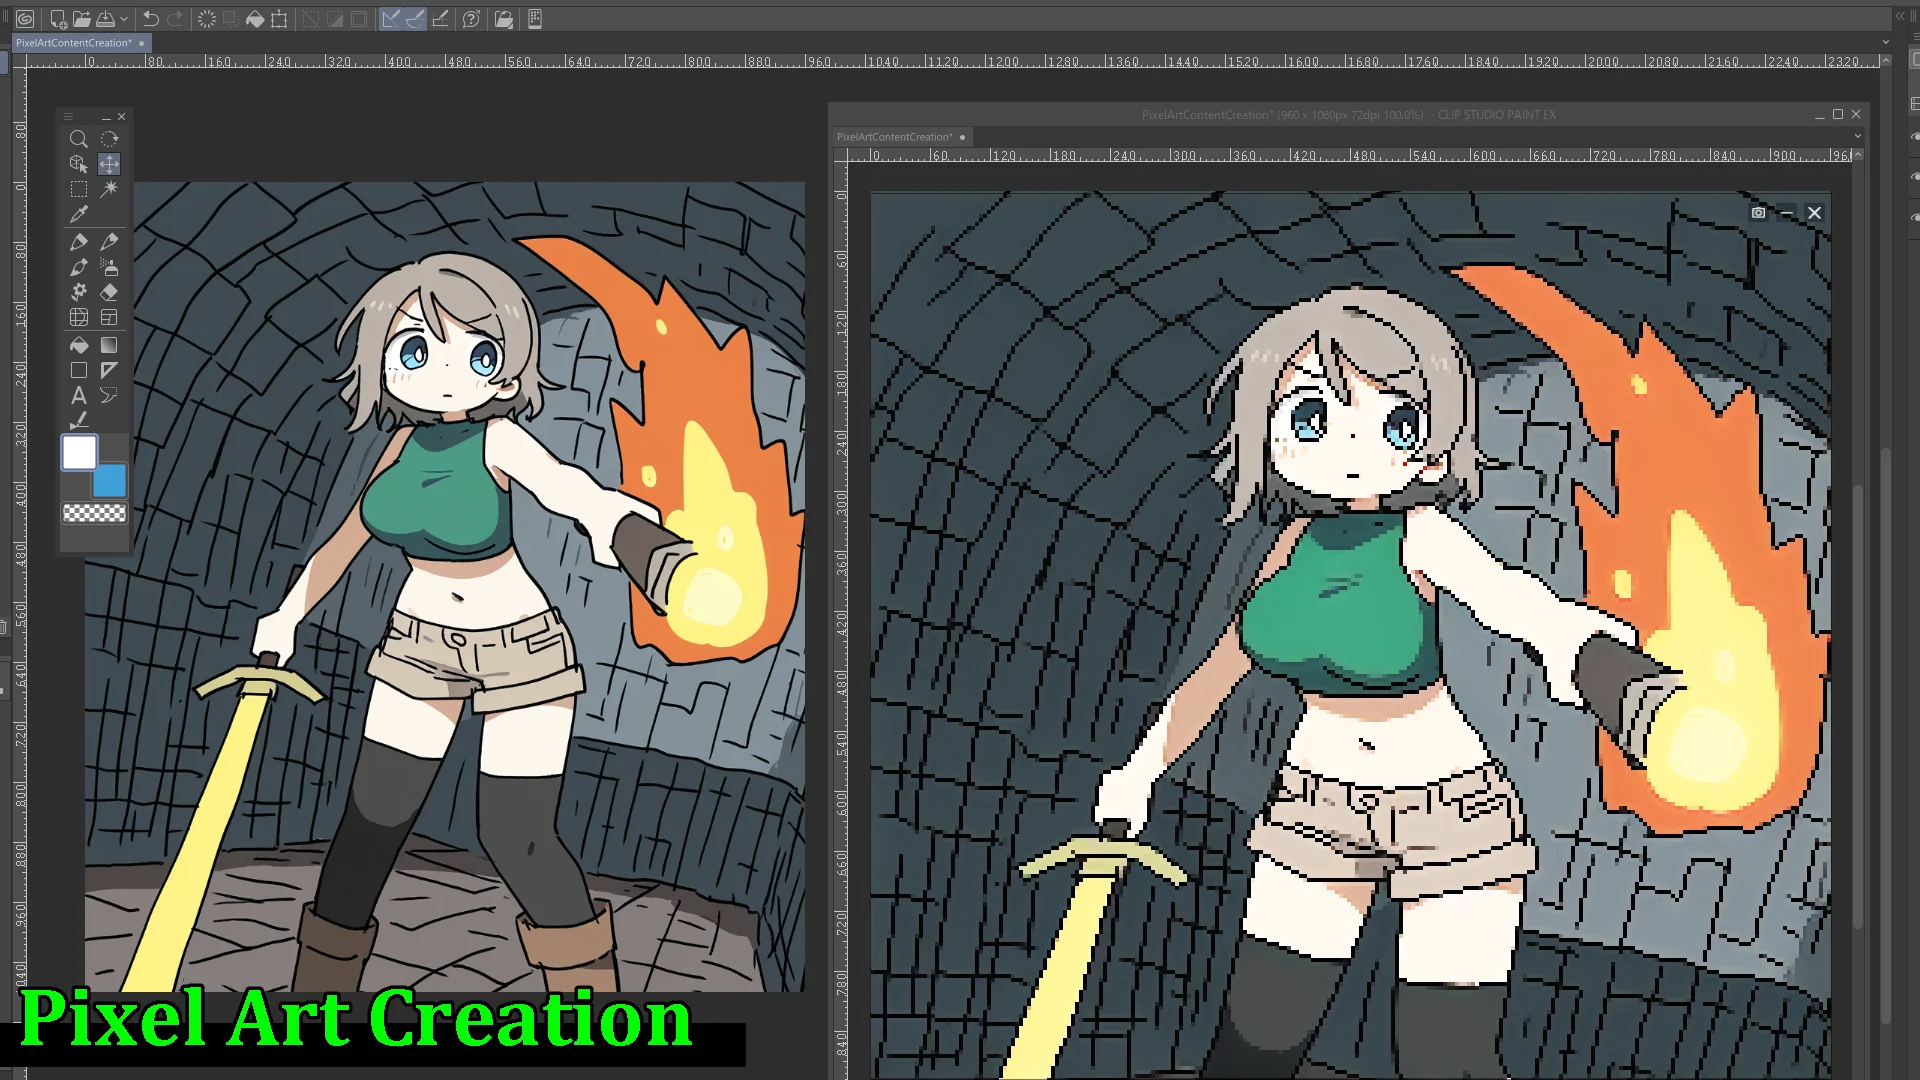
Pixel-art Creation
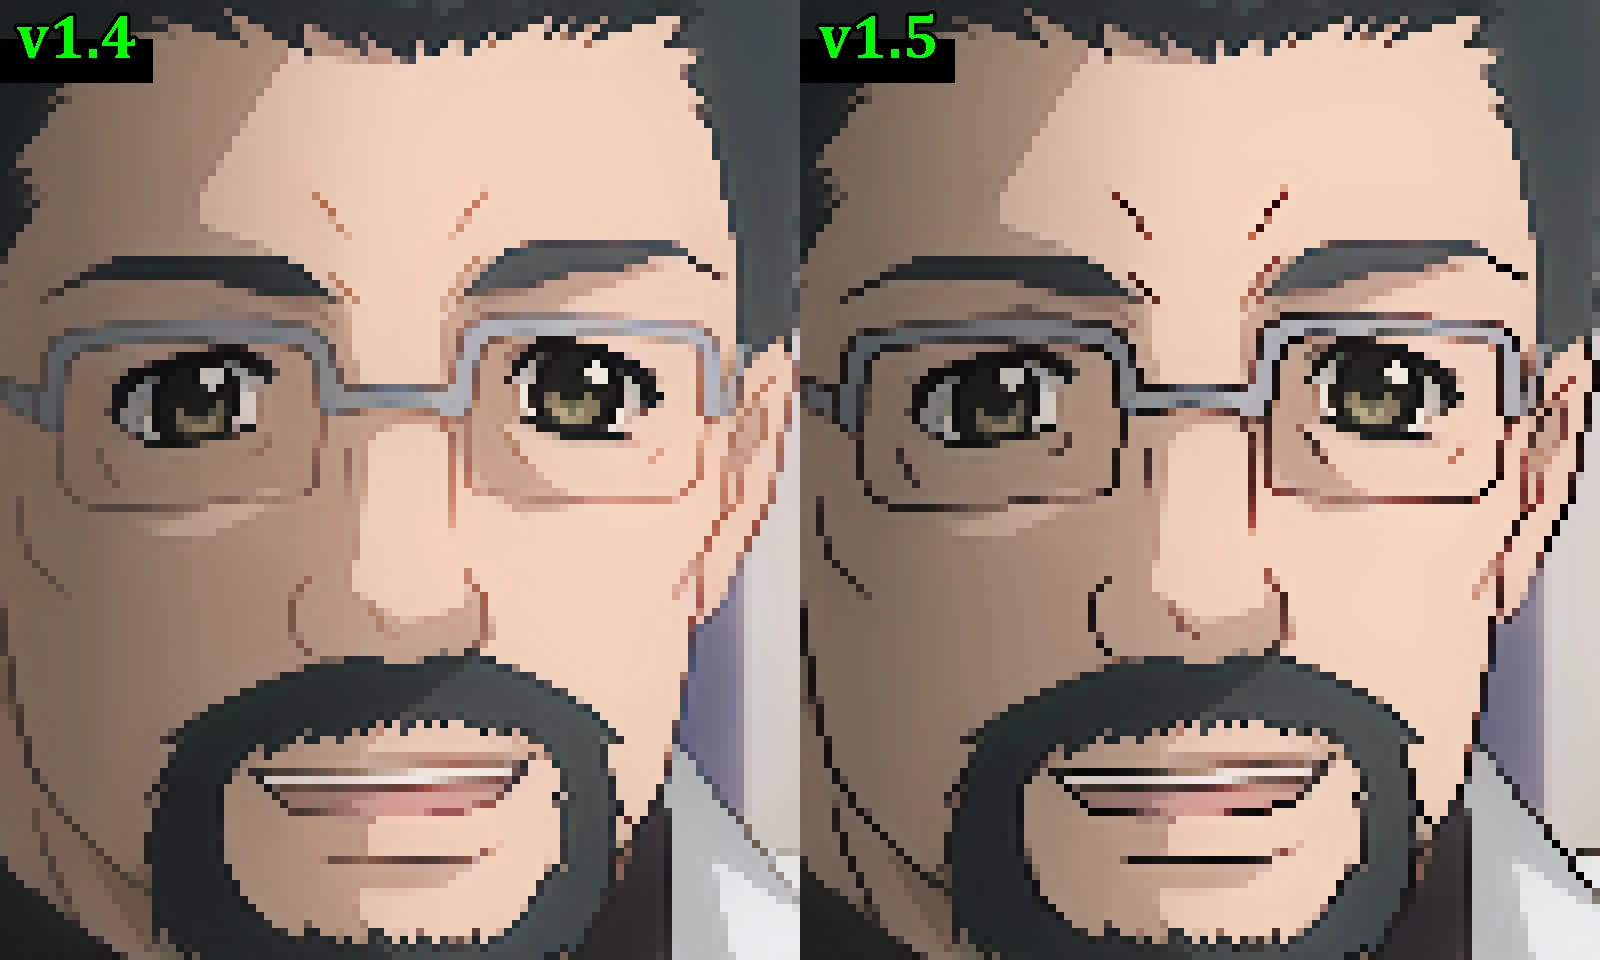
v1.5 Update (October 9, 2026)
v1.5 is out as a free update with two big improvements that make large dot sizes (6×6 to 8×8) look far better — good enough for everyday use. You can now easily enjoy the chunky, characterful pixel art that only large dots give, like on old game consoles, with your anime and game footage.
An AI for each dot size
Until now, at larger dot sizes the picture was first shrunk and then handed to the AI, so thin lines tended to fade or break up. v1.5 has a dedicated AI for each dot size: it restores lines that faded when the picture was shrunk, and redraws them at a thickness that suits the dot size. When you change the dot size, Pixel Lens switches to that size’s AI automatically.
- Even at 6×6 to 8×8, outlines stay crisp and unbroken
- Fine details such as face outlines and eyes keep their shape better
- Performance is the same as v1.4
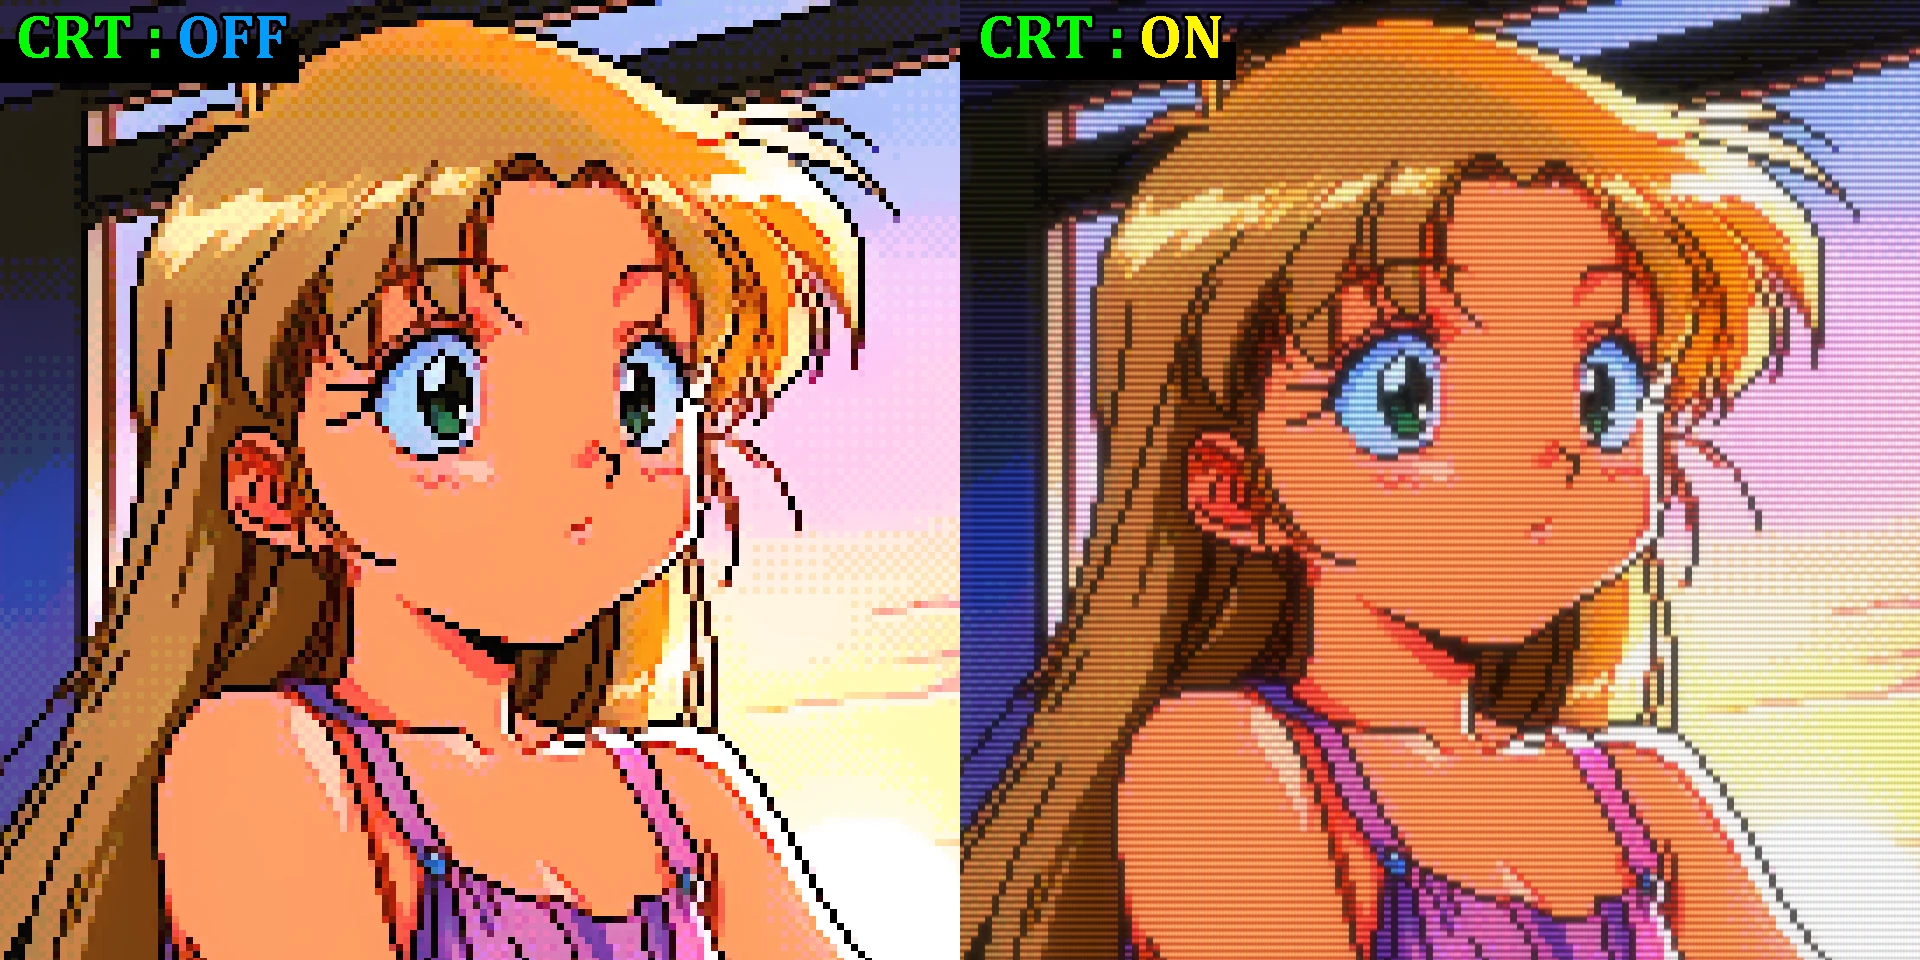
CRT effect
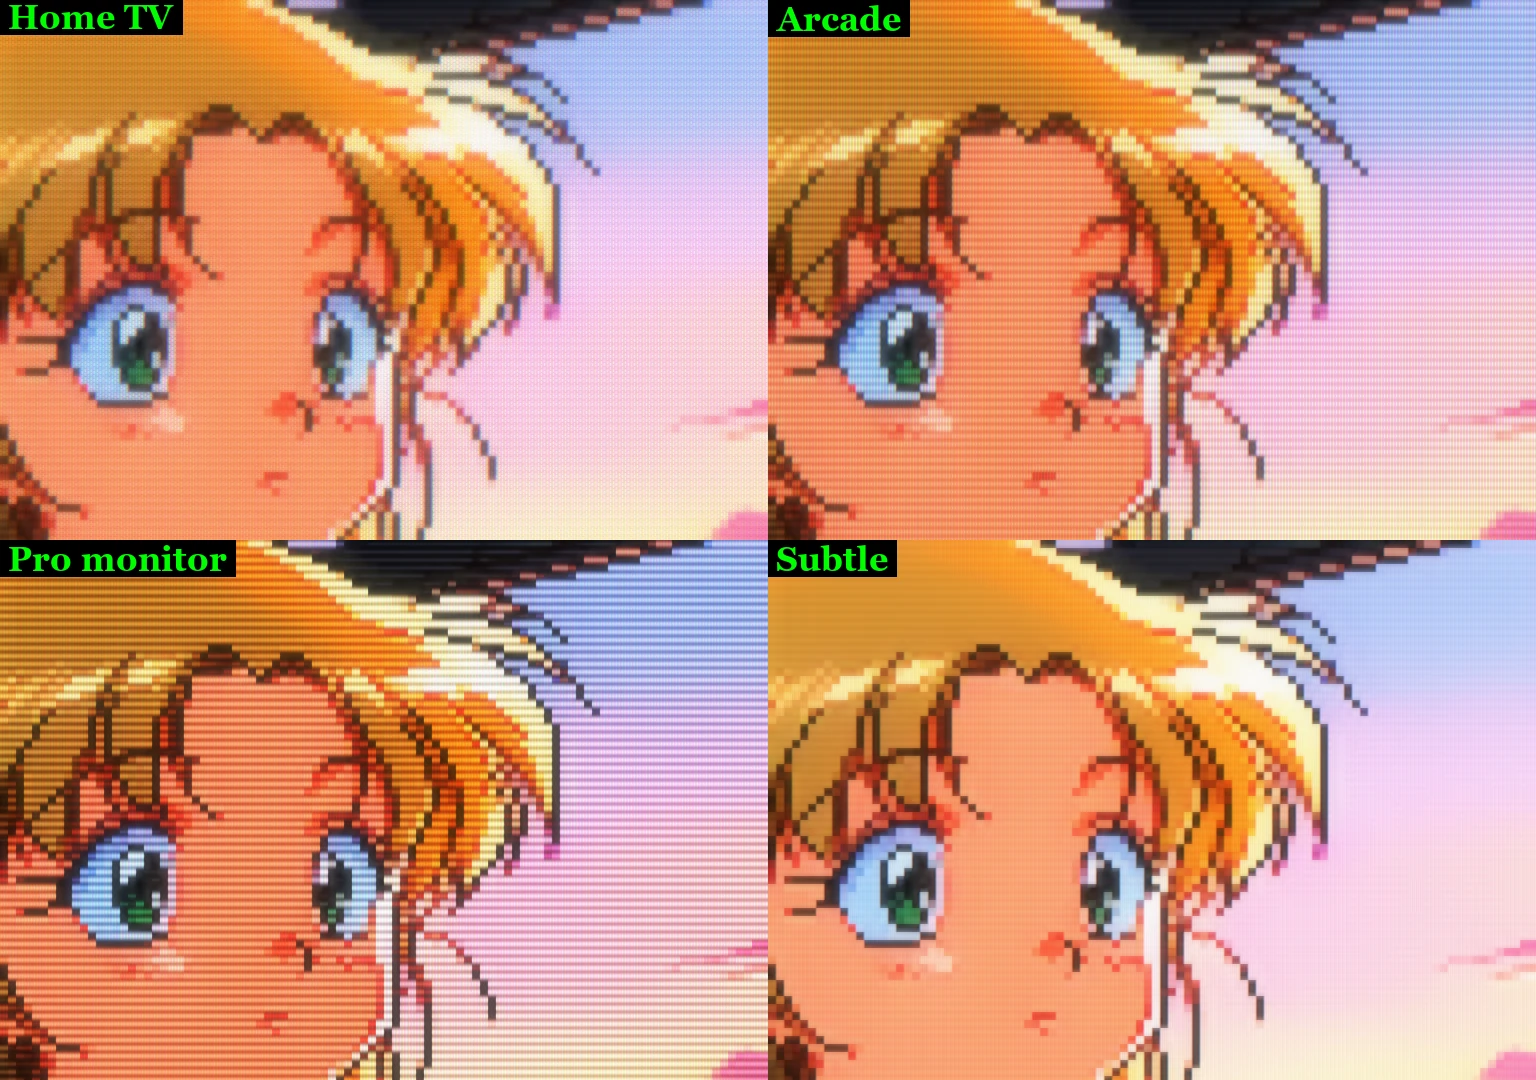
The new “CRT effect” shows the picture like an old CRT TV. It recreates scanlines, light that glows out of bright areas, the fine pattern of the screen, a gently curved screen and more, and the margin around the screen is softly lit by the colors of the picture. Because it softens blocky dots and heavy black outlines just enough, it’s an especially good match for large dots.
Tick “CRT” on the control panel and pick a profile (off by default).
- Home TV: a curved screen with soft, glowing light
- Arcade: fine RGB stripes and a slight curve
- Pro monitor: a sharp picture with strong scanlines, on a flat screen
- Subtle: just light scanlines, on a flat screen
“Details…” lets you fine-tune things like the scanline strength and the curve of the screen. Once you adjust anything, the profile becomes “Custom”, and you can always return to a profile’s values by picking it again (adjusted values are saved in presets too).
- The CRT effect applies to the lens and to the picture in Stream Mode (virtual camera)
- Screenshots save an image with the CRT effect in addition to the pixel-art image
- With “Raw Text” on, text such as subtitles is shown as the original picture, without the CRT effect
- It runs on the GPU, so it adds almost no load
Refreshed official presets
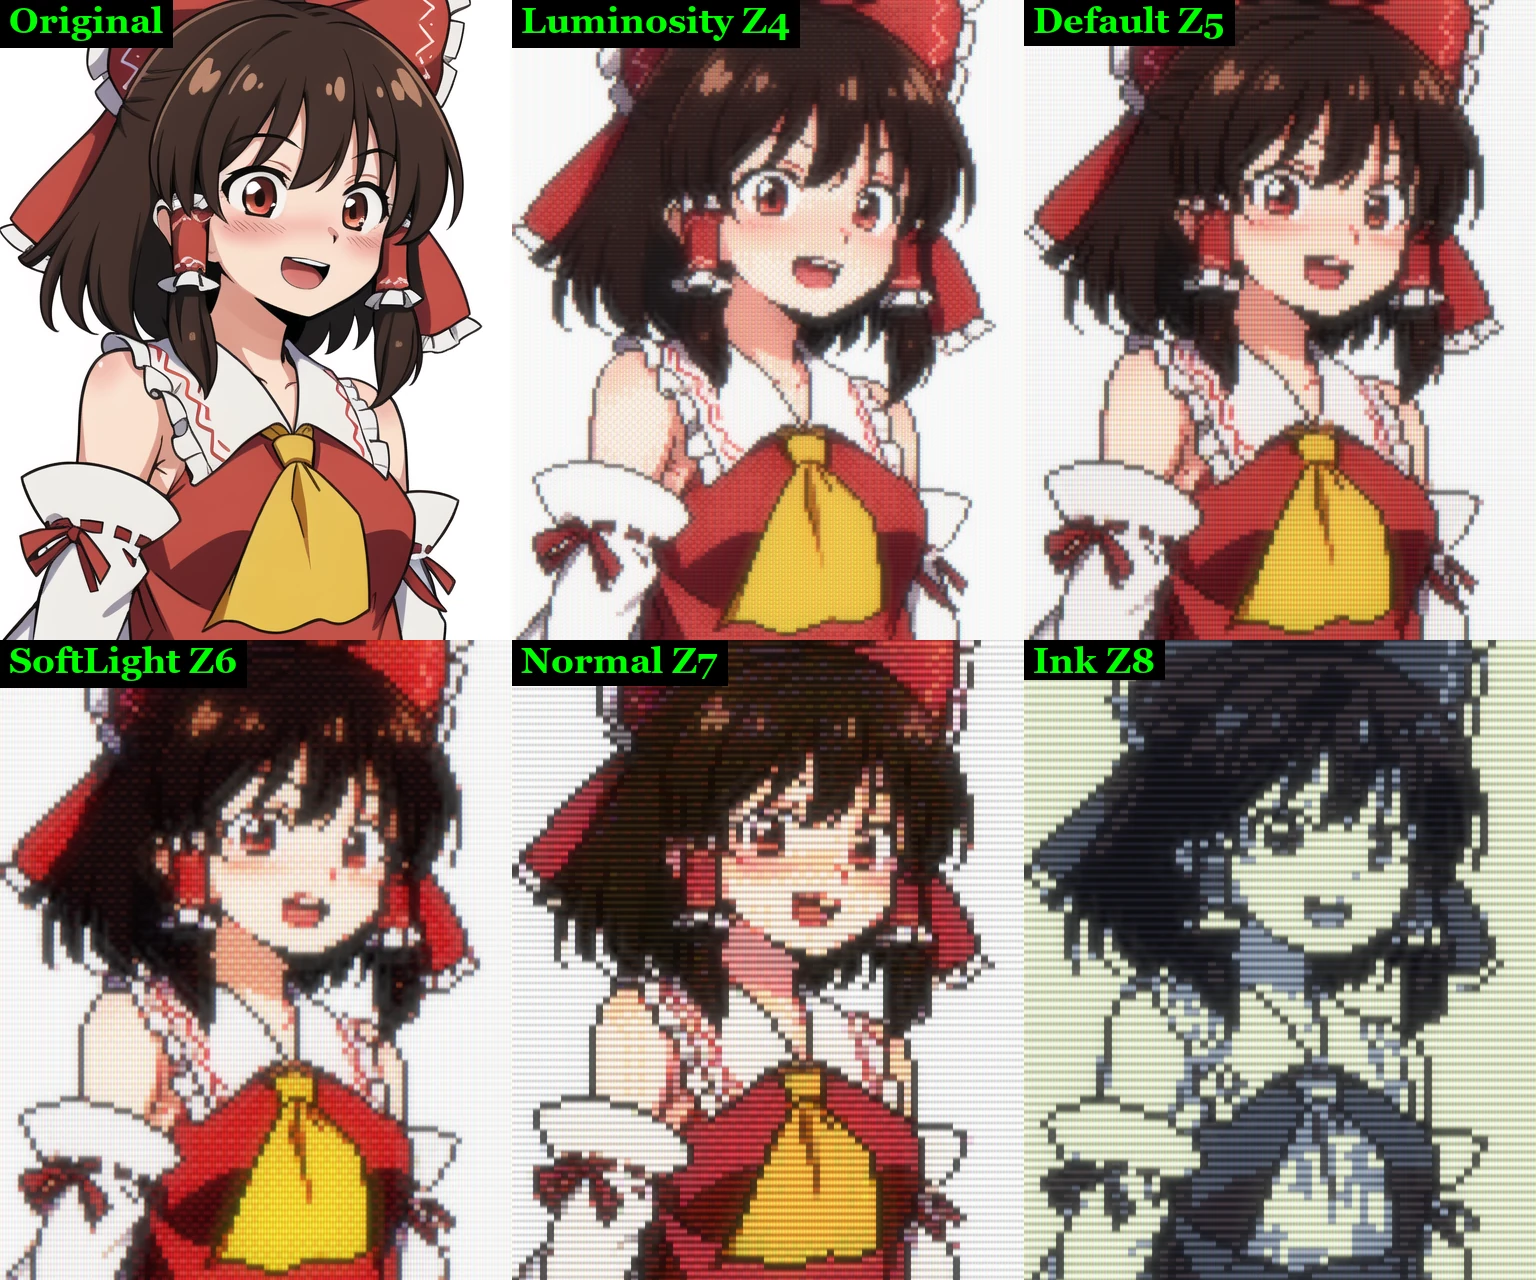
We rebuilt the official presets for the new AI and the CRT effect, and each name now ends with its dot size (Z5 means 5×5). All of them turn the CRT effect on.
- Official Luminosity Z4: shading that takes on the brightness of the 64-color palette “resurrect-64”. CRT: “Home TV”
- Official Default Z5 (new): no palette, the original colors as they are. CRT: “Arcade”
- Official SoftLight Z6: the 32-color palette “endesga-32” layered in Soft Light mode, for a vivid finish. CRT: “Arcade”
- Official Normal Z7: the Windows 95 256-color palette layered on top, close to the original picture. CRT: “Pro monitor”
- Official Ink Z8: drawn with the 5-color palette “ink”, for a monotone finish. CRT: “Pro monitor”
The previous official presets (Official Ink and the others) have been replaced by the newly named ones.
Fixes and other changes
- Fixed an issue in v1.4 where “Raw Text” was more likely to show areas that weren’t text as the original picture
- In the CLI,
--crt <TV|Arcade|PVM|Soft|none>applies the CRT effect. Presets with the CRT effect work as they are with--preset, and the output is written at the same size it appears on screen
v1.4 Update (October 3, 2026)
v1.4 is out as a free update focused on image quality: pixel-art outlines are even crisper, and the color noise that could appear in dark scenes is reduced.
Improved unsharp mask
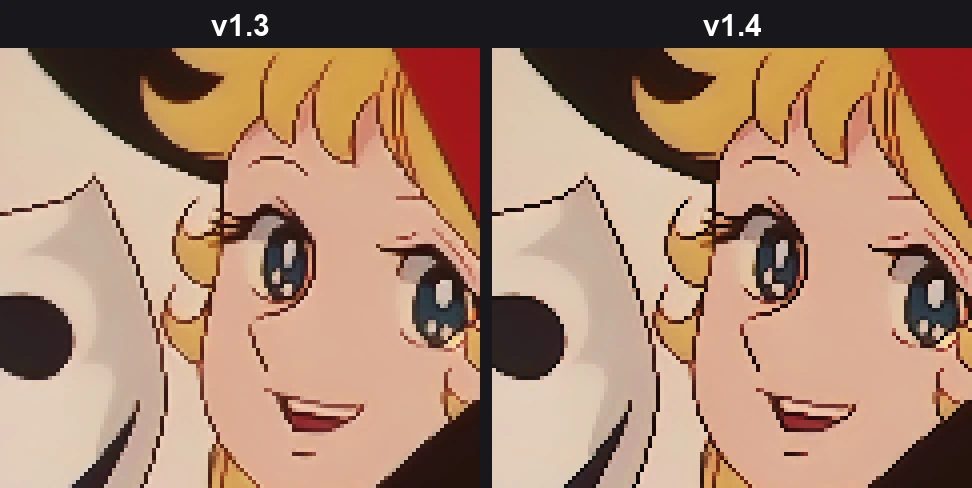
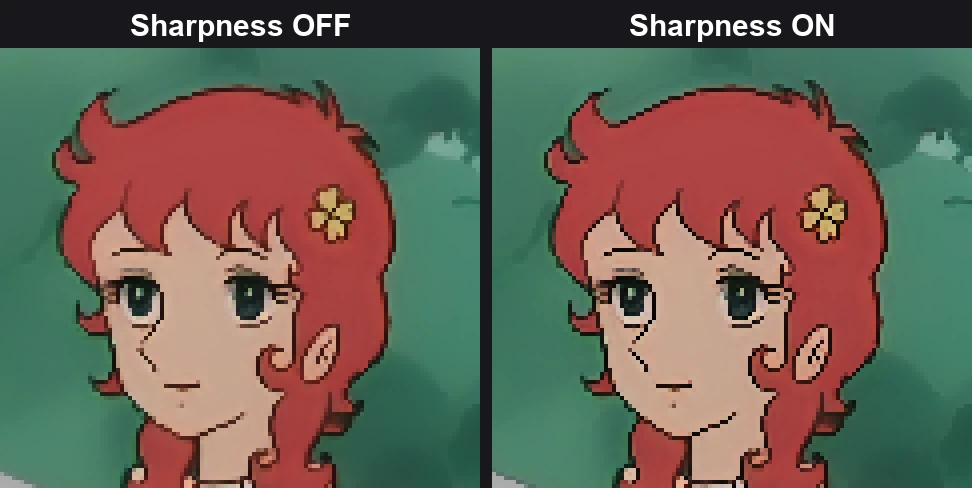
We improved the “unsharp mask” that tightens the outlines of the pixel art. Applied strongly, the previous one left whitish fringes along the outside of the lines, so it had to be kept fairly weak. In v1.4 the outline itself is still drawn dark and tight, but the whitish fringe outside it no longer appears, so the effect can be applied much more strongly while the image stays clean.
- Pixel-art outlines come out darker and crisper
- Line steps line up neatly, giving lines that look more like hand-made pixel art
- Blurry older anime and footage degraded by compression also get tighter outlines
- Performance is about the same as v1.3
Less color noise in dark scenes
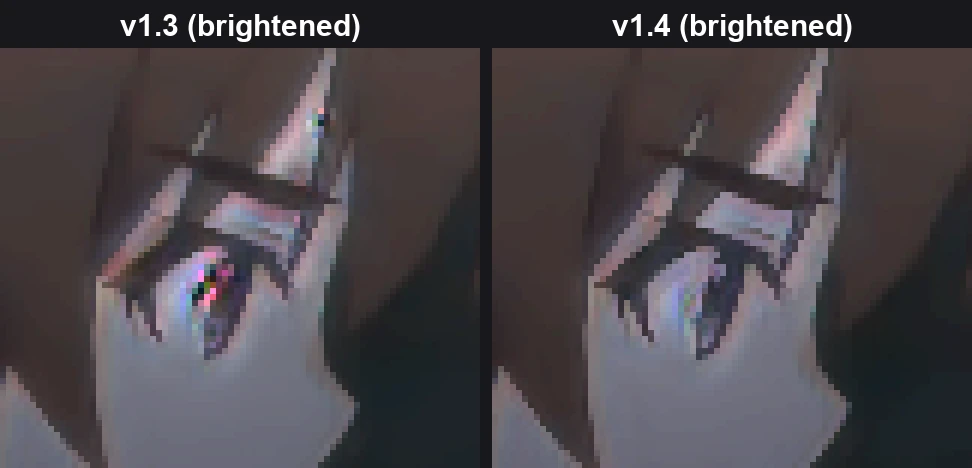
In dark, low-contrast scenes, rainbow-colored noise that is not in the original video could appear around characters’ eyes and similar spots. In v1.4 we tracked down the cause and fixed it, so this color noise is now much less noticeable. Stray dots of colors that are not in the original video also appear less often in other scenes, so the whole image looks clearer.
Sharpness is now an on/off switch
“Sharpness” in the control panel has changed from a 0–1 adjustment to an on/off switch (on by default). When it is on, the improved unsharp mask is applied at the best strength. Turn it off for softer outlines and a calm, anti-aliased look.
- The Sharpness setting is saved in presets as well
- Your previous Sharpness value is not carried over; Sharpness is on after the update (presets saved in v1.3 or earlier load with it on too)
- In the CLI, turn it off with
--no-sharpen. The--sharpnessoption has been removed (it is ignored if passed)
v1.3 Update (September 25, 2026)
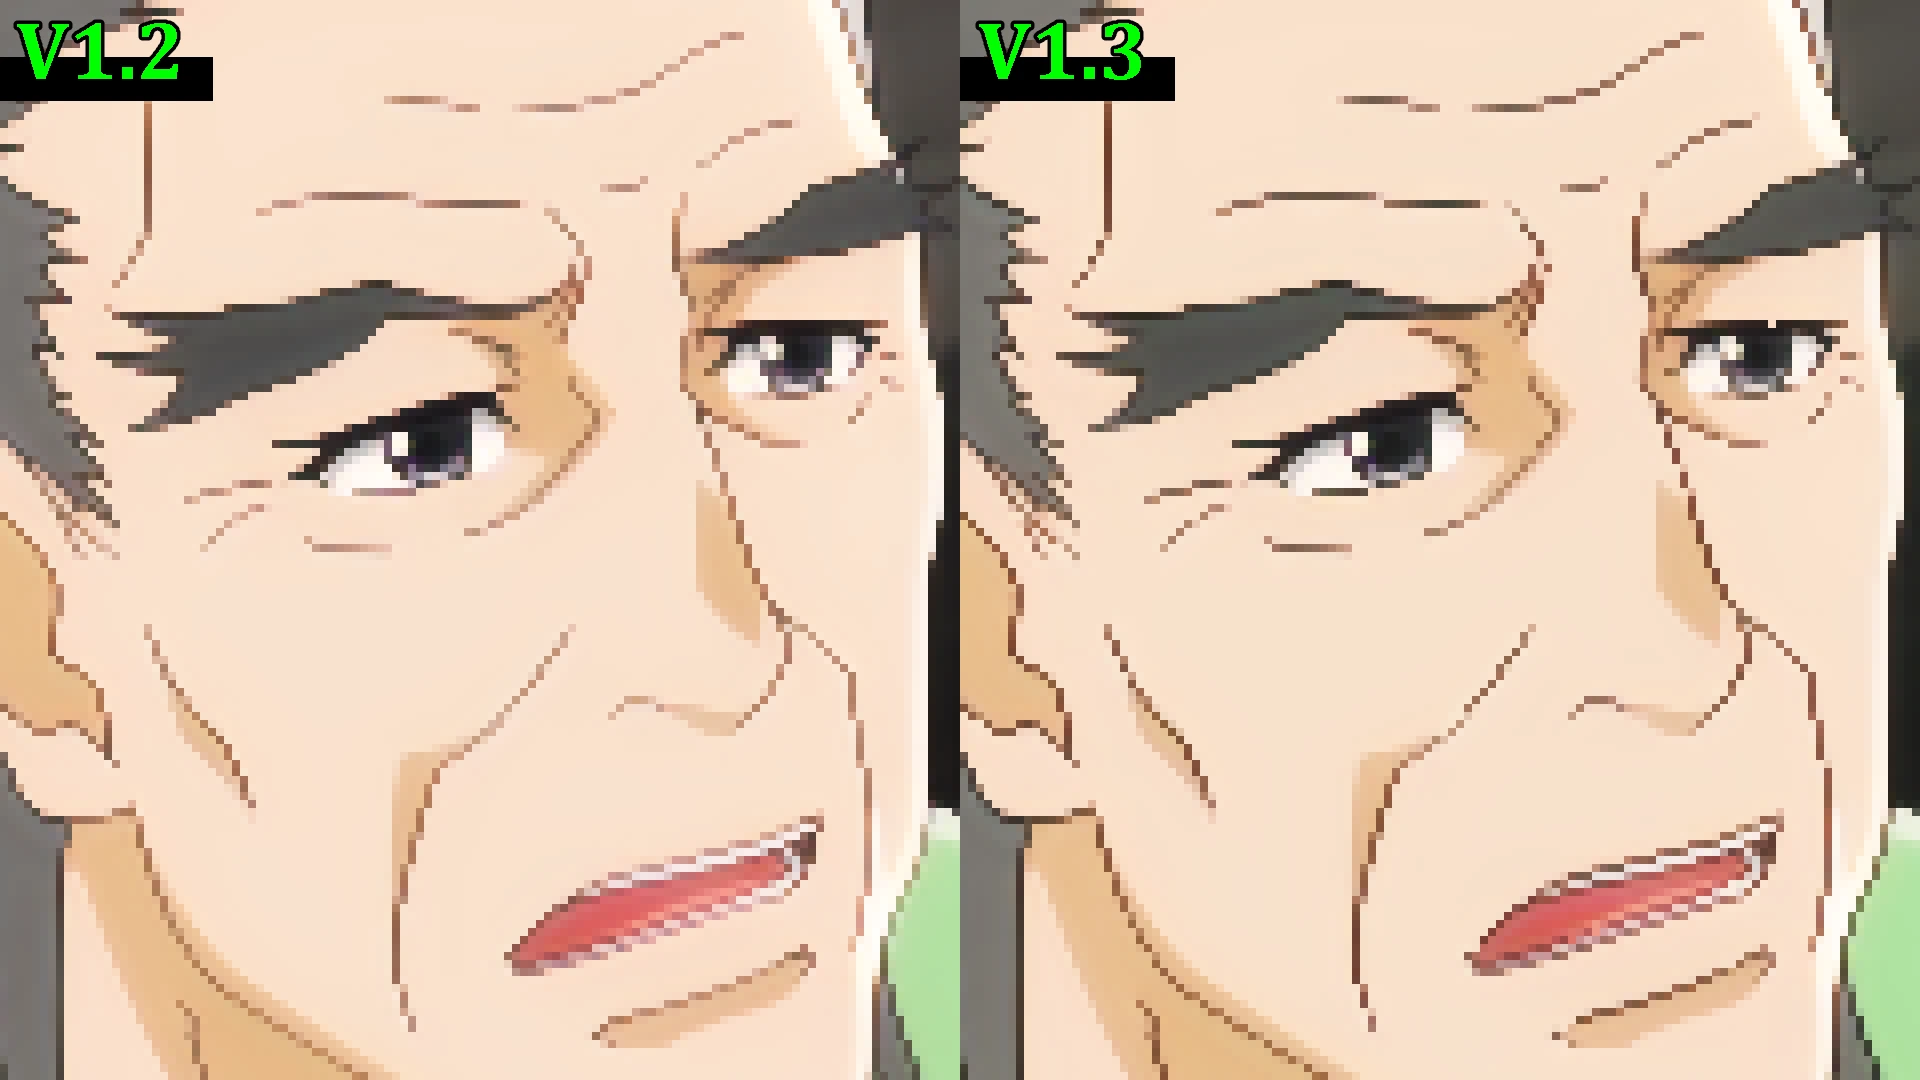
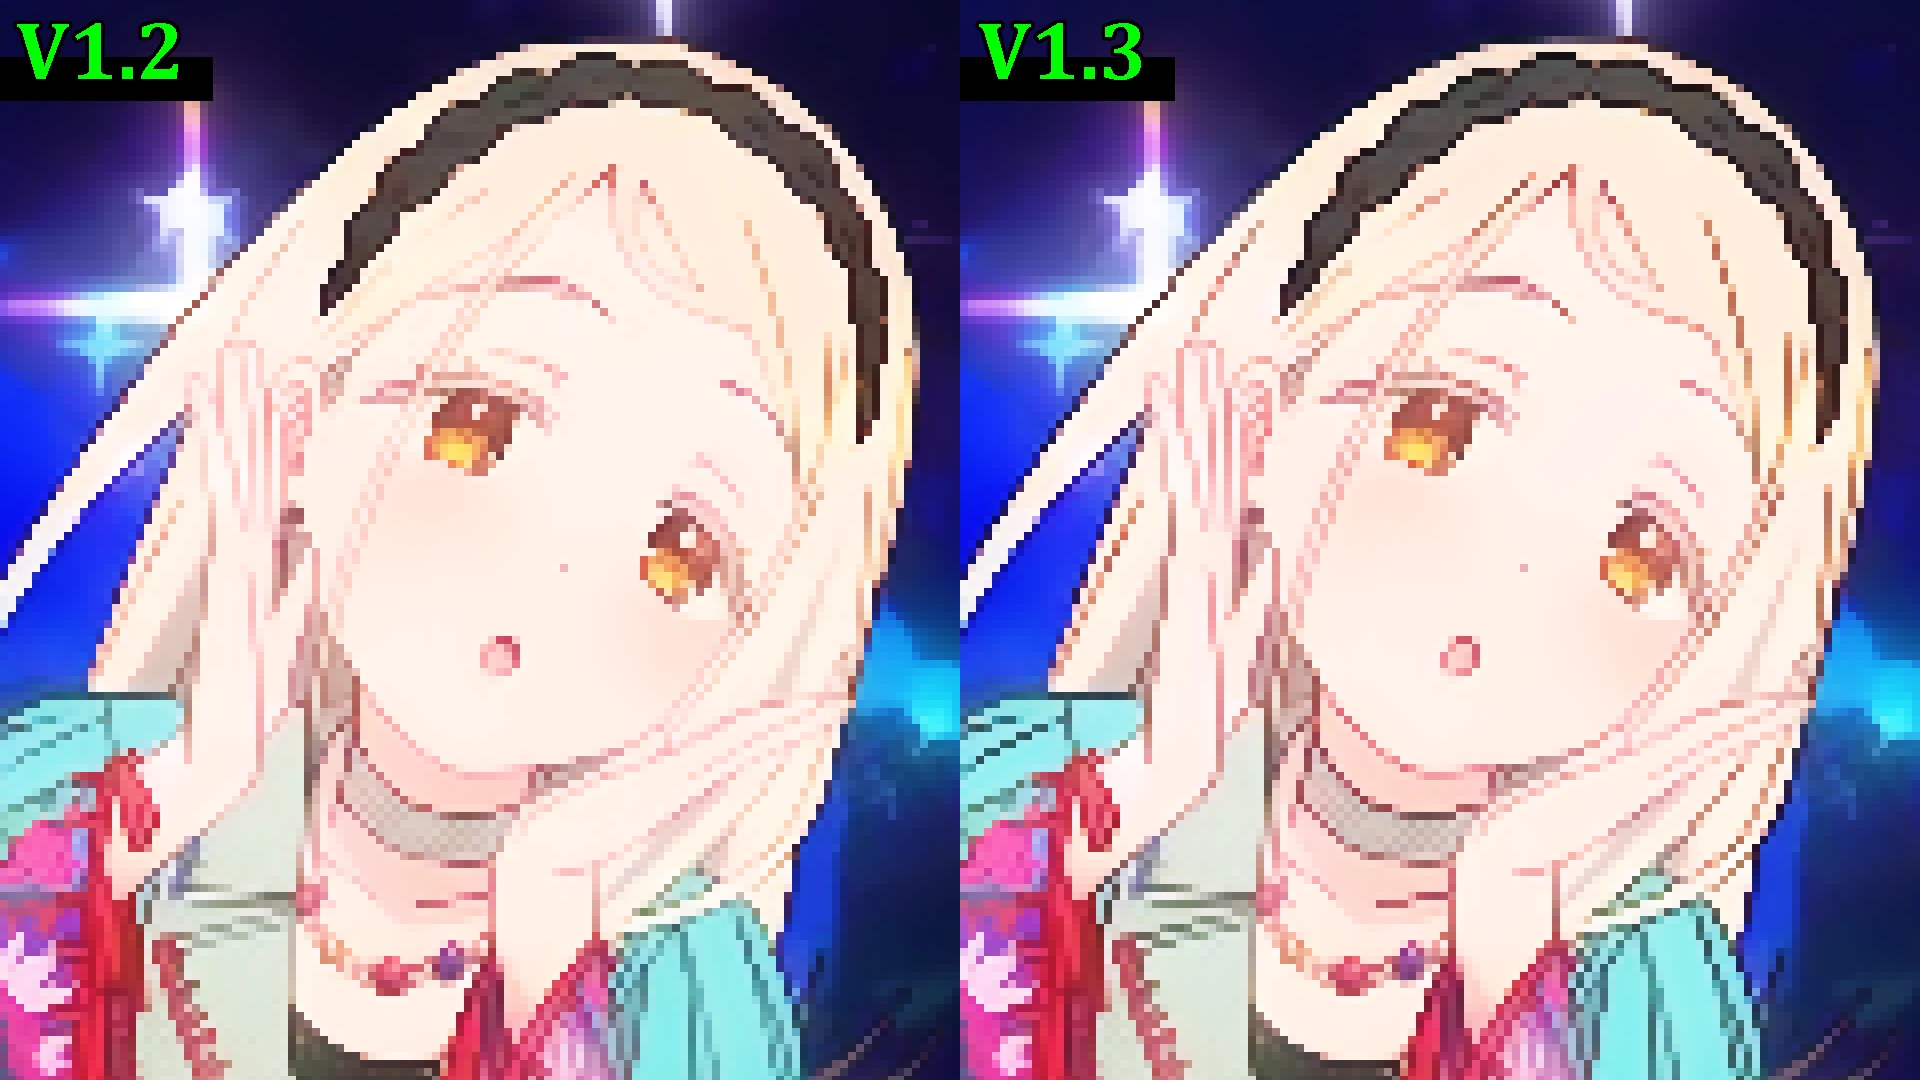
v1.3 is out as a free update: a new AI model that makes outlines crisper, plus the Thin Lines option and four official presets.
Updated AI model
The AI model that creates the pixel art has been updated. It was retrained on targets whose line widths were matched to the dot grid, so outlines now come out sharper and cleaner. Color in dark scenes and performance are unchanged from v1.2.
Thin Lines
Where a diagonal line steps down one row at a time, two dots could end up side by side and the line looked thick. Tick “Thin Lines”, to the right of FPS in the control panel, and that extra dot is removed, leaving the outline one dot wide (on by default).
- The shape of each line is judged frame by frame, so a few dots along a line may flicker slightly in video
- It costs about 1.7 ms per frame at Full HD. Untick it to go back to the raw output
- The setting is stored in presets as well
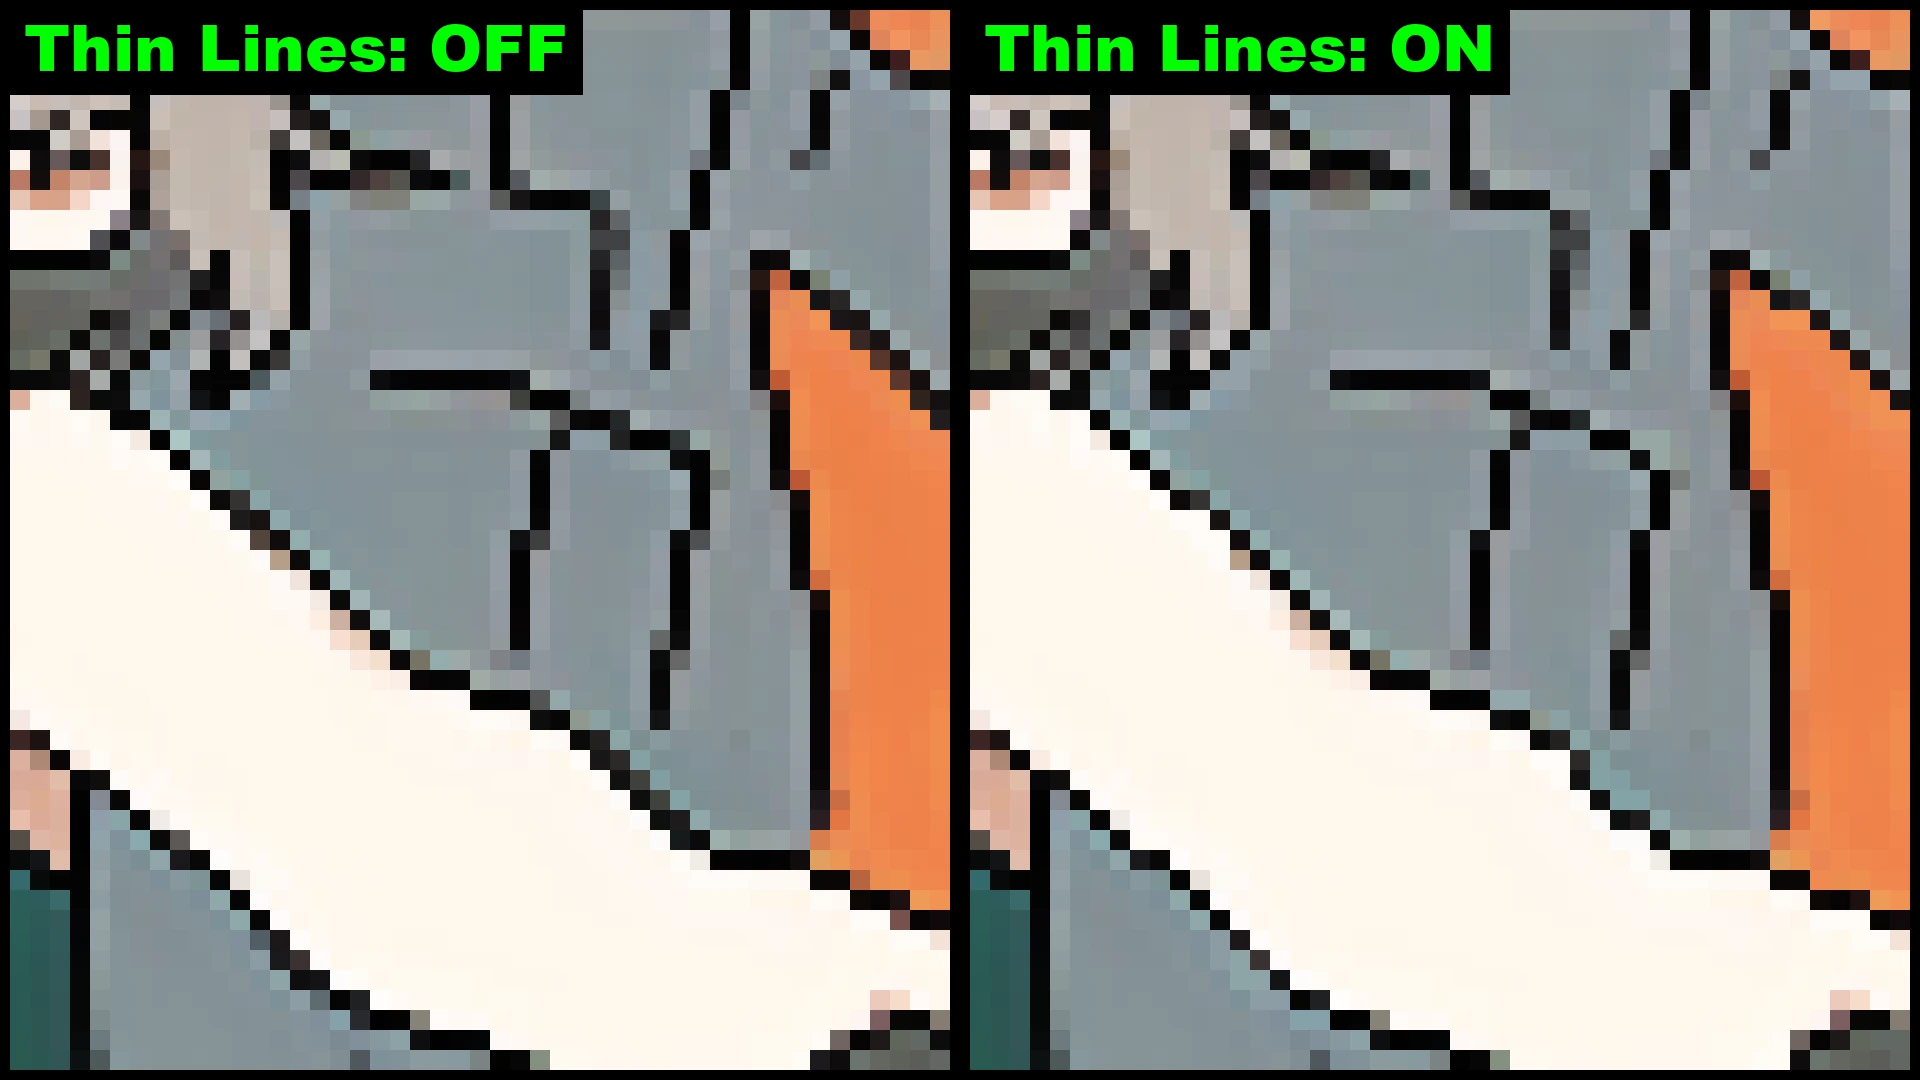
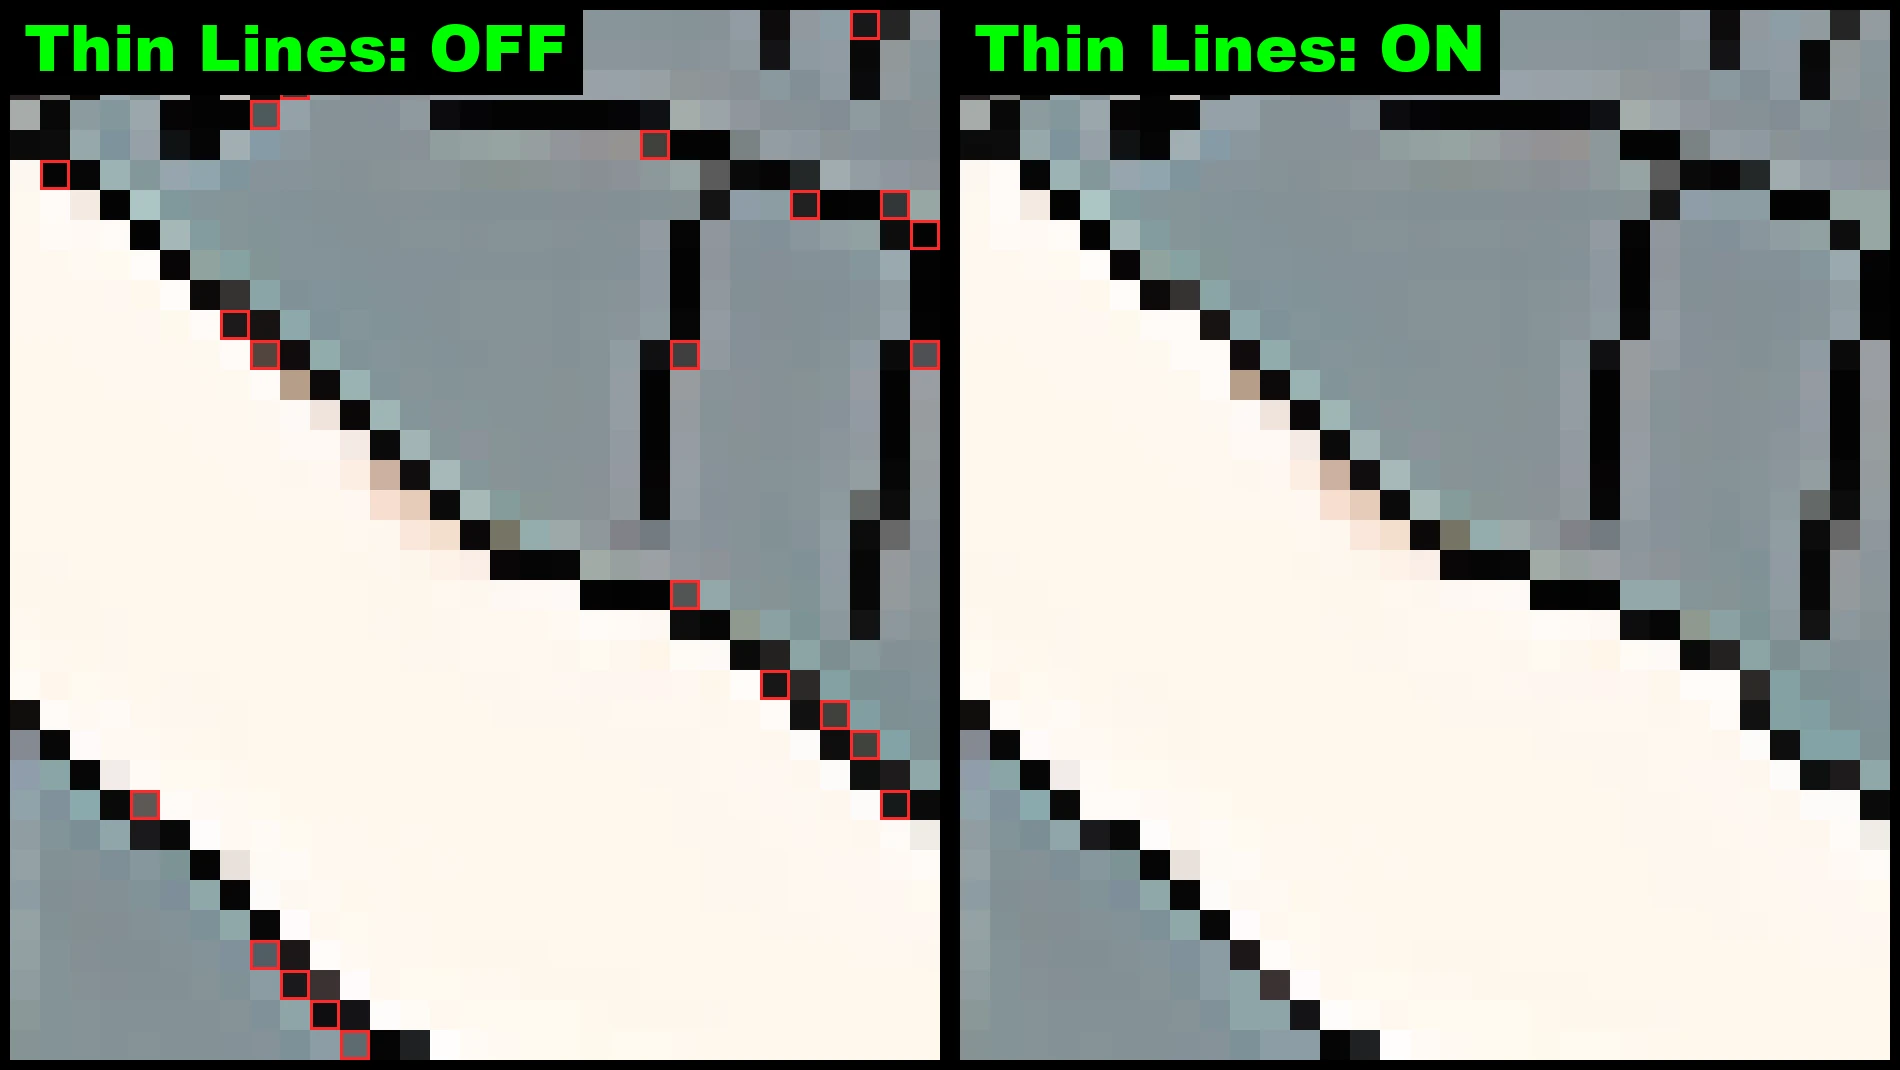
The red outlines on the right show the dots that Thin Lines takes away.
Four official presets
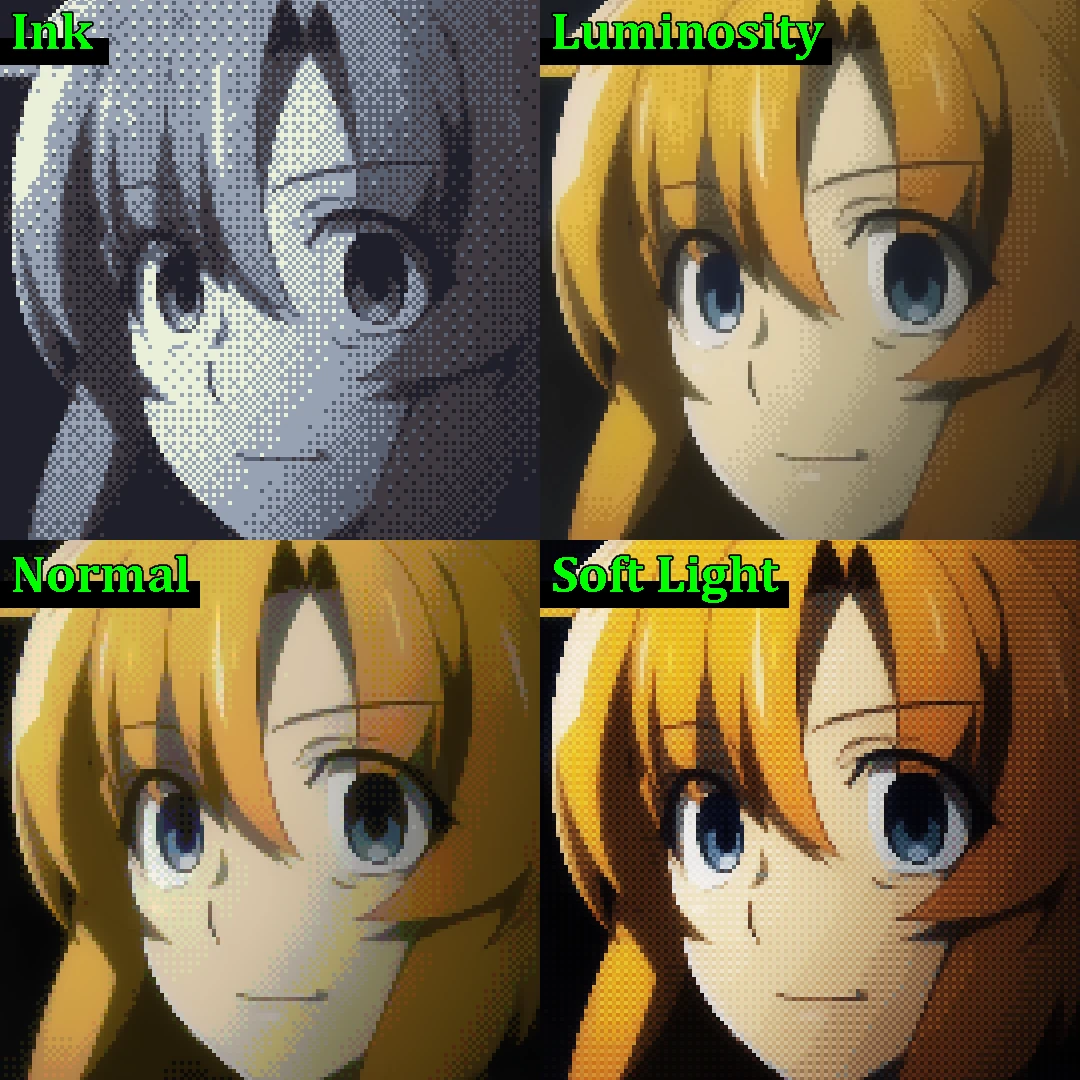
Four official presets now ship with the app, ready to use. Pick one from “Preset” at the top right of the control panel.
- Official Ink: drawn with the new 5-color palette “ink” alone, for a monochrome, printed-in-ink look
- Official Luminosity: takes only the brightness of the 64-color palette “resurrect-64”, keeping the original colors while adding pixel-art shading
- Official Normal: the Windows 95 256-color palette laid on lightly, for a natural look close to the original picture
- Official SoftLight: the 32-color palette “endesga-32” blended with Soft Light, for strong contrast and vivid colors
The official presets live in the presets folder next to PixelLens.exe. Save one under the same name and your own tweaked version takes precedence. With “ink” added, 39 palettes are now included.
Fixes and other changes
- Fixed colors from the previous frame lingering during fast motion while a palette was in use, which looked like an afterimage. The cause was the dither stabilization added in v1.2, so that feature has been removed
- The status bar at the bottom of the window is now available in all 15 languages (it was English only)
- In the CLI,
--no-corner-thinningturns Thin Lines off.--dither-stabilityhas been removed (it is ignored if you pass it)
v1.2 Update (September 15, 2026)
v1.2 is out as a free update, adding four new features.
Palettes
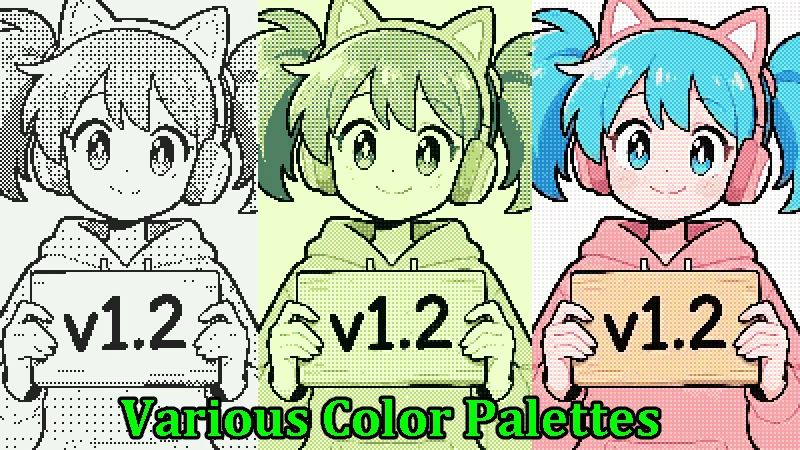
Render the pixel art using only a fixed set of colors (a palette). Game Boy style, PICO-8 style, Windows 95 style: just limiting the colors instantly makes the picture look like a retro game screen.
- 38 palettes are included, so you can try popular classics from LOSPEC right away
- Blend (16 modes) and Opacity control how much the palette colors are mixed with the original colors
- Choose between two types of dither: Bayer for a regular, halftone-like pattern, or error diffusion for smooth gradients. Dithering on flat areas is stabilized so the pattern does not flicker in videos
- Add your own palettes by dropping a single-row PNG (1 pixel = 1 color), such as those shared on lospec.com, into
%APPDATA%\PixelLens\palettes\
Text Passthrough
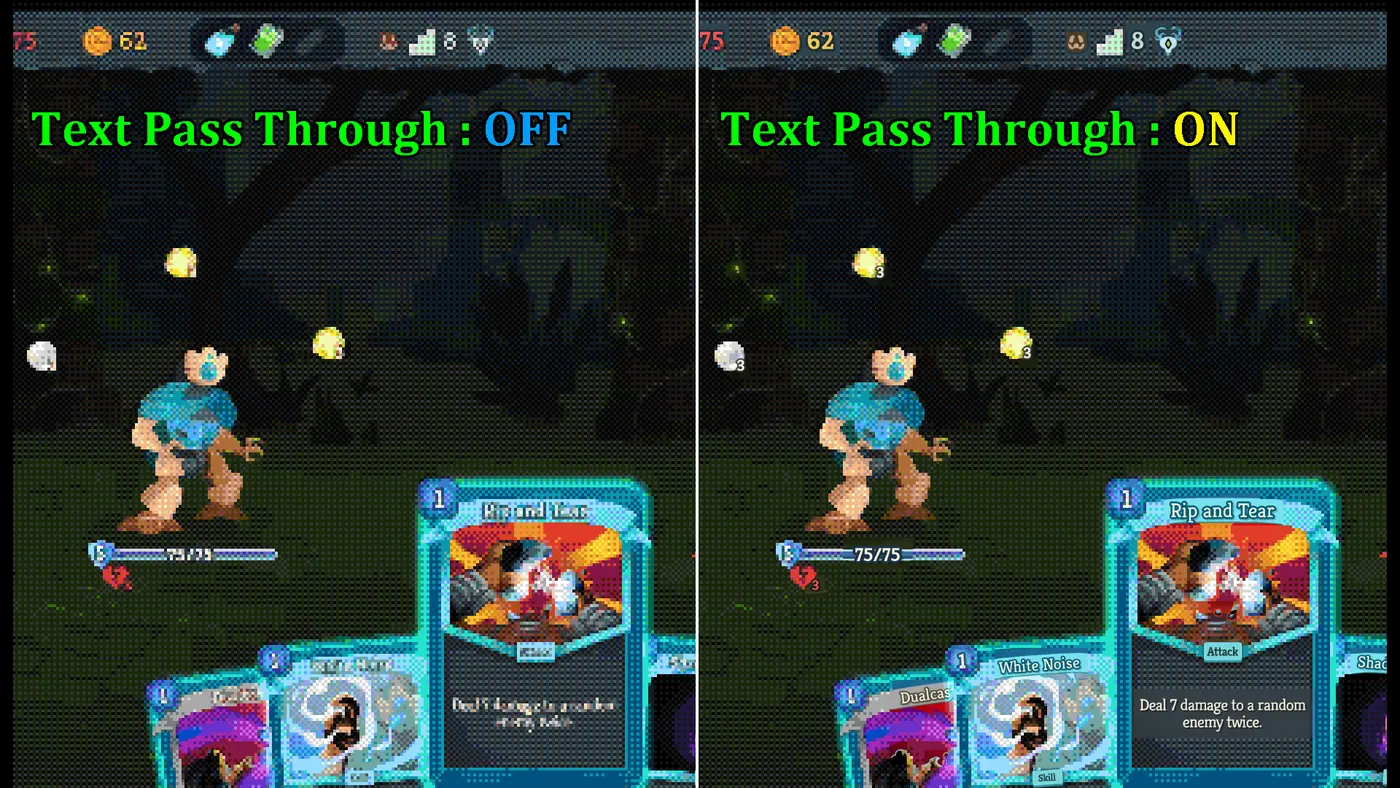
The built-in AI finds text on screen and shows just those areas at their original resolution, without pixelating them, so subtitles, stream chat and game menus stay readable.
- Text detection runs on the same AI, at the same time as the pixel-art conversion, so it adds almost no extra load
- Adjust how strongly text is detected and how much of the area around it is kept as-is. While you adjust, the detected areas are highlighted in red so you can see the effect
- It also applies to screenshots and to the virtual camera output
Presets
Save all your settings at once — dot size, sharpness, FPS, palette and text — and recall them with one click. Keep one per purpose, such as “Anime”, “Game streaming” or “Black-and-white manga”, and switching takes a moment.
Presets are stored as files in %APPDATA%\PixelLens\presets\, so they are easy to back up or share.
CLI (command-line tool)
pixellens-cli.exe now ships with Pixel Lens. Separate from the real-time screen conversion, it converts image files, folders of image sequences and video files on your computer to pixel art in batches.
- Use the presets you saved in the app directly
- Output is written at actual size, 1 dot = 1 pixel by default, ready to edit in pixel-art software
- Videos are exported in a format with no quality loss (converting video requires ffmpeg, installed separately)
- Stop a large conversion midway and resume where you left off. Add
--gputo convert faster on the GPU
Run pixellens-cli --help for the full option list.
Where to Buy
Pixel Lens is out now. The price is $4 USD. The latest version is v1.5 (released October 9, 2026), a free update if you already own it.
- Steam: Pixel Lens - Realtime Pixel Art Filter
- itch.io: panzersoft.itch.io
- BOOTH: panzersoft.booth.pm
Tips (details not covered on the store page)
How to use Stream Mode
Besides the lens mode, Pixel Lens has a Stream Mode that outputs the converted image as a virtual webcam called “Pixel Lens Virtual Camera”. OBS, Zoom, and other apps see it as a regular webcam, so you can pixel-art your whole game stream or video call.
- Switch to STREAM mode in the control panel (or press the hotkey
Ctrl+Shift+V) - Pick the window or monitor you want to convert
- In OBS: add a “Video Capture Device” source and select “Pixel Lens Virtual Camera” from the device list
If it doesn’t show up properly:
- Black image → make sure Stream Mode is ON in Pixel Lens (no frames are produced unless Stream Mode is running)
- The device doesn’t appear in OBS → restart OBS so it re-enumerates DirectShow devices
- Not recognized after a Windows update → re-register the virtual camera filter from Settings → Virtual Camera → Re-register
- The aspect ratio of the video capture looks wrong in OBS → restart OBS and re-create the Video Capture Device source. Make sure to re-create the device after Pixel Lens’s Stream Mode is already running
- Note: Discord does not recognize the virtual camera (use OBS / Zoom etc.)
Keyboard Shortcuts (global hotkeys)
These hotkeys work system-wide, even while another app has focus.
| Key | Action |
|---|---|
Ctrl+Shift+D | Toggle pixel-art conversion on/off (raw passthrough when off) |
Ctrl+Shift+M | Minimize the lens to a 64×64 icon / restore it |
Ctrl+Shift+S | Save a screenshot of the current pixel-art view |
Ctrl+Shift+V | Toggle Stream Mode |
Ctrl+Shift+Z | Cycle through dot sizes (4–8) |
Performance Tips
- The AI optimizes its compute kernel for the first lens-window size it sees after each launch. Resizing later still works, but inference runs ~3x slower until you restart the app. Once you’ve found your favorite size and shape, keep the app at that size — Pixel Lens remembers the lens position and size automatically
- Smaller lens areas run faster
- Sharpness is on by default. If outlines feel too crisp, turn it off for a calm, anti-aliased look
CRT Effect Tips
- Especially recommended with large dot sizes (6×6 to 8×8): it softens blocky dots and black outlines just enough
- When you use a small lens, set the screen shape (curvature, corner radius and vignette) to 0 in “Details…” for a clean, flat picture right to the edges
- Values you adjust in “Details…” can be saved in a preset. Pass that preset to the CLI with
--presetfor the same look
Screenshots
- Saved to
Pictures\PixelLens\by default (configurable in Settings), namedpixellens_DATE_TIME_WxH.png - Enabling the “view-size copy” setting also saves a second PNG upscaled to the on-screen view size using nearest-neighbor interpolation
- With the CRT effect on, the picture as it appears on screen, CRT effect included, is also saved (the file name ends in
_crt) - If the help overlay gets captured in your screenshots, turn off the help display in Settings to keep it out of the shot
Other
- If the itch.io / BOOTH (ZIP) version shows “GPU acceleration unavailable” and falls back to CPU, install the Microsoft Visual C++ 2015-2022 Redistributable (x64)
- Pixel Lens never sends any data over the network. All inference happens locally on your GPU (settings are stored in
%APPDATA%\PixelLens\)
Updates
- v1.5 (October 9, 2026) added an AI for each dot size and the CRT effect, and refreshed the official presets. See the “v1.5 Update” section above for details
- v1.4 (October 3, 2026) improved the unsharp mask, reduced color noise in dark scenes, and made Sharpness an on/off switch. See the “v1.4 Update” section above for details
- v1.3 (September 25, 2026) updated the AI model and added the Thin Lines option and four official presets. See the “v1.3 Update” section above for details
- v1.2 (September 15, 2026) added palettes, text passthrough, presets and the CLI. See the “v1.2 Update” section above for details
System Requirements
- Windows 10 (2004) or later / Windows 11 (64-bit)
- DirectX 12 / DirectML-compatible GPU
- Real-time FullHD (1920×1080) conversion: ~24 FPS on an RTX 3060, 60 FPS (the frame-rate cap) on an RTX 3090. Smaller lens areas run faster
- UI available in 15 languages, including English and Japanese
Support
Bug reports, suggestions, feedback, and translation fixes are all welcome:
- Discord: https://discord.gg/wJJZABEbVs
- Email: support (at) panzersoft.com
- X (Twitter): @panzersoft1
When reporting an issue, please include the warning log from the Settings screen (there’s a Copy button) — it makes investigation much easier.
For Media / Press
A press kit (icon, key visuals, screenshots, promo videos, and fact sheet) is available. All assets may be used freely for coverage of Pixel Lens.
- Press kit (Google Drive)
- Interview requests: support (at) panzersoft.com